TROUBLESHOOTING IPHONE REBOOT: How to Fix an iPhone that Restarts Every Three Minutes
Why does my phone keep restarting? My phone will only stay on for three minutes before rebooting, what gives? I can’t back up my phone because it won’t stay on long enough!**
These are complaints that we commonly hear from people asking us for help to get back their photos, videos and other data when their iPhone stops working. In our microsoldering training courses, we’ve noticed that many incoming students recognize these problems, but they don’t know WHY the phone reboots after three minutes. What is causing the 3 minute boot loop?
The good news is that many of these common faults ARE SOLVABLE without needing to mail us your phone for data recovery. We’re going to show you how to find the fault and fix your rebooting phone.
The CORE Problem: MISSING THERMAL SENSOR DATA
The underlying reason for all of the “iPhone reboots after three minutes” or the "3 minute Boop Loop" is always the same, even though there are many causes. The problem is missing temperature data. The CPU must get a periodic thumbs up from a suite of thermal sensors tucked away in different places across the phone. When one of these sensors is damaged, missing, or unable to connect to the CPU, that’s where we get the rebooting problem. The phone will “listen” for the thermal sensor data, asking again and again “are we about to catch on fire?” If three minutes elapses without any response from the sensor then the CPU panics and reboots the phone. In the panic logs we can find phrases like “thermalmonitord” or “missing gas gauge temperature service” that help us to recognize what ties all these problems together---temperature.
The Cancer of iPhones: HEAT
Heat is one of the biggest villains of any mobile device. Your desktop computer has an array of CPU coolers, thick copper heat shields, and multiple fans to keep the hardworking chips cool. But those luxuries were whittled away to shoehorn extreme function into miniature spaces in today’s iPhones. Your iPhone logic board relies on heat dissipation only through the board itself, hoping to exhaust the increasing heat into the frame and ultimately your hand or the environment. That’s a tough way to do it. Without good heat management, the life of the components of the phone will be shortened, the processing speed degraded, or worse--fire.
WHERE are the thermal sensors?
From this framework, we can see how terribly important it is for the CPU to be vigilant in order to protect itself from overtemperature events. On early phones, there was only one temperature sensor, and it was located in the battery. Today’s phones have temperature sensors everywhere! There are sensors in the battery, charge port, on the board itself, on the power button flex, and even on the front screen (proximity) flex.
DIFFERENT PHONES REQUIRE DIFFERENT SENSORS
To complicate things further! For example, the iPhone 11 has a required temperature sensor on the power flex, where the iPhone 12 does not. The iPhone 13 and the similar 13 Pro require different sensors! In addition, iOS CAN CHANGE WHICH SENSORS ARE REQUIRED. At any point, Apple can update iOS to change the way the phone responds to missing sensor data. Where an iPhone 11 might require that power flex thermal sensor today, in a future iOS it may not. This is why developing an understanding of the spirit of the problem is important--so that you can figure out how to solve your iPhone sensor-based rebooting problem today, and in the future.
HOW are thermal sensors damaged?
Your iPhone can develop the three minute reboot loop from sensor damage in a variety of ways:
Damage to the sensor itself
Damage to the sensor itself (Battery, Charge Port, Power Flex, Front Screen Flex, Logic Board)
Damage to the flex connecting the sensor to the board
Damage to the connector on the board that receives the sensor data
Damage to sensors in the board
“Layer damage” where there are missing connections between the two sides of the logic board
Damage to the chips that convey the sensor data to the CPU
Damage to the CPU
WHICH THERMAL SENSOR CIRCUIT IS MY PROBLEM?
Method 1: Known Good Parts
One way to solve a three minute reboot loop is with a known good OEM parts. If your logic board is able to stay on longer than three minutes with a known good battery, charge port, and power flex connected, then you can use the process of elimination to determine which sensor component in your native housing is the problem. Remember that it is not enough to simply disconnect the offending component. The CPU requires that each thermal sensor be present and connected to the CPU in order to give its periodic thumbs up. If your known good parts don’t solve, try putting your logic board in a complete known good housing. If your phone still can only stay on for three minutes, then you know you have a board level problem. These can still be solved, but these jobs will require microsoldering and logic board repair such as our mail-in repair service. (Click Get Started above for more information, or Training to learn to do these jobs yourself.)
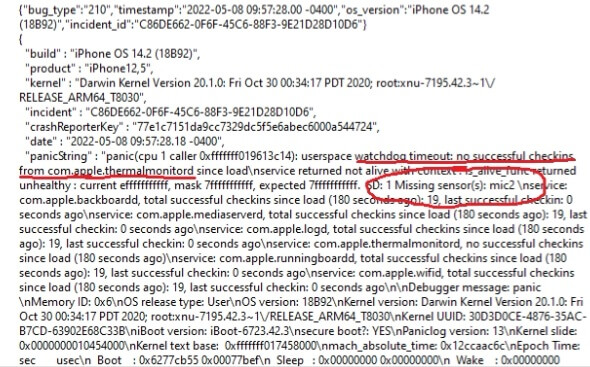
Method 2: Use the Panic Logs
A more precise method to determine which sensor circuit is the problem is to read the panic logs. The panic logs can be retrieved either by:
-
Navigating on the device: Settings→Privacy→Analytics&Improvement→Analytics Data then scrolling to the panic-full logs.
- Using 3utools or similar third party software and selecting “Crash Logs” and opening the panic-full logs.
With each new phone and iOS updates, the specific phrasing the panic logs use to describe sensor errors can change over time, which makes simply having a look at your panic logs a great strategy. Look for keywords such as “thermalmonitord” “temperature service” “temp” “watchdog timeout” “sensor” to help you find where in the log the missing sensor fault occurs.
SMC ASSERTION FAILED SENSOR ARRAY CODES
Newer phones such as 13 series and up have sensor codes. Look for the phrase “SMC Panic” “ASSERTION FAILED” “SMC BSC FAILURE” and “SENSOR ARRAY” then you’ll see a code.
* If there is more than one problem the sensor arrays may show combined. For example if there is a problem with the charge port and the proximity flex you may see 0x1800 (0x800+0x1000).
13 Series
Sensor array 0x800 Charge Port Flex
Sensor array 0x1000 Proximity Flex
Sensor array 0x4000 Battery
0x400 Sandwich Board Issue (iPhone Mini Only)
14 Series
iPhone 14 and 14 Plus
Sensor array 0x100000 Charge Port Flex
Sensor array 0x200000 Proximity Flex
Sensor array 0x400000 Wireless Charging
Sensor array 0x500000 Battery Communication
iPhone 14 Pro and 14 Pro Max
Sensor array 0x10000 Power Button Flex
Sensor array 0x80000 Proximity Flex
Sensor array 0x40000 Charge Port Flex
Sensor array 0xc0000 Prox Flex, Power Button
Sensor array 0x1c0000 Charge port, Power Button, Prox Flex**
Sensor array 0x20000 Sandwich board issue
**Sensor array **0x41 Battery Data Issue
15 Series
iPhone 15 and 15 Plus
Sensor array 0x80000 Charge port flex
Sensor array 0x100000 Proximity Flex
Sensor array 0x200000 Wireless Charging
iPhone 15 Pro and 15 Pro Max
Sensor array 0x300000 Charge port flex
Sensor array 0x100000 Proximity Flex
Sensor array 0x400000 Wireless Charging
Sensor array 0xa1 Battery Data Issue
16 Series
iPhone 16 Pro Max
Error 3145728 Charge port flex
Working Guide to iPhone Thermal Sensor Panic Log Data:
Which sensor circuit is which? Once in the logs, the names of the sensors themselves can be a bit cryptic. Here is a working guide to help you match your problem sensor to the problem part.
Remember: DIFFERENT PHONES REQUIRE DIFFERENT SENSORS. iOS UPDATES CAN CHANGE REQUIRED SENSORS OR THE PANIC LOG LANGUAGE. This is a working list that will change over time.
PROBLEM SENSOR PART
LOG MAY SAY
Charge Port
Mic1, Prs0, 0x800, 0x40000, 0x100000, 0x300000, 3145728
Battery
Gas Gauge, TG0v, TB0v, TG0B, 0x4000, 0x500000, 0x41, 0xa1
Power Flex
Mic2, 0x100000
Front Top Screen Flex (proximity/als)
0x1000, 0x80000, 0x200000
Wireless Charging Flex
0x200000, 0x400000
Sandwich Board Issue
0x400, 0x20000
Prox Flex, Power Button
0xc0000
Charge Port, Power Button, Prox Flex
0x1c0000
- If there is more than one problem the sensor arrays may show combined. For example if there is a problem with the charge port and the proximity flex you may see 0x1800 (0x800+0x1000).
HOW TO FIX iPHONE TEMPERATURE SENSOR PROBLEMS
Change the Part
Once you’ve identified which sensor circuit is the problem, it’s time to troubleshoot. Most of the time the problem is water damage to the sensor part. Changing the affected part is going to solve the majority of 3 minute reboot issues. However, once you’ve ruled that out, then you have to dig deeper to solve board level issues.
Inspect Connector for Damage:
At board level, you can inspect the connector for the affected sensor part under the microscope. A common problem with connectors is a tiny bit of “widening” of the sensor data pins which create an open line when the sensor part is plugged in. Replacing or reworking the connector will solve.
Diode Mode:
Diode mode in the connector will help to identify short circuits or open lines that could be preventing the sensor information from reaching the CPU. Once identified, clear the short or close the open to solve. A common sensor fault is technician damage to components near the battery connector that convey battery data to the CPU. It is easy to detect this open line problem because the battery data pins will read OL in the connector.
Replace Chips:
It is not common, but it is possible that damage to the chips that pass the sensor data along to the CPU can become damaged. An example of this is damage to the tigris charging ic from a faulty charger. Tigris can become damaged so that it is not able to pass battery sensor data to the CPU. You can rule out faults like this simply by replacing the chip.
Fix any ‘layer damage’
Some of the temperature sensor circuitry is embedded within the board itself as thermistors that report board temperature to the CPU. These lines are labeled NTC, “negative temperature coefficient” and appear throughout the board. Any damage to the NTC circuity can result in the confusing data being sent to the CPU. This can manifest as the symptom of the board not being able to remain booted for more than 3 minutes. If any NTC circuitry is damaged from hard drops, runovers, falls on the double-layered logic board, this must be repaired. You can see an example of this specific fault in this iPad Rehab video. iPhone 12 Pro Max TEMPERATURE WARNING FIXED LIVE
With these strategies, you should be able to identify and correct any 3 minute boot loop. If you fixed yours, let us know in the comments! If you’re still struggling, or get to the point that you need iPhone data recovery or mail in repair service to help you solve yours, just click Get Started above. If you’d like to learn more about our in-person hands on microsoldering training courses to learn to solve the board level issues, click Training.